Monday, March 7, 2011

Bike Project Done

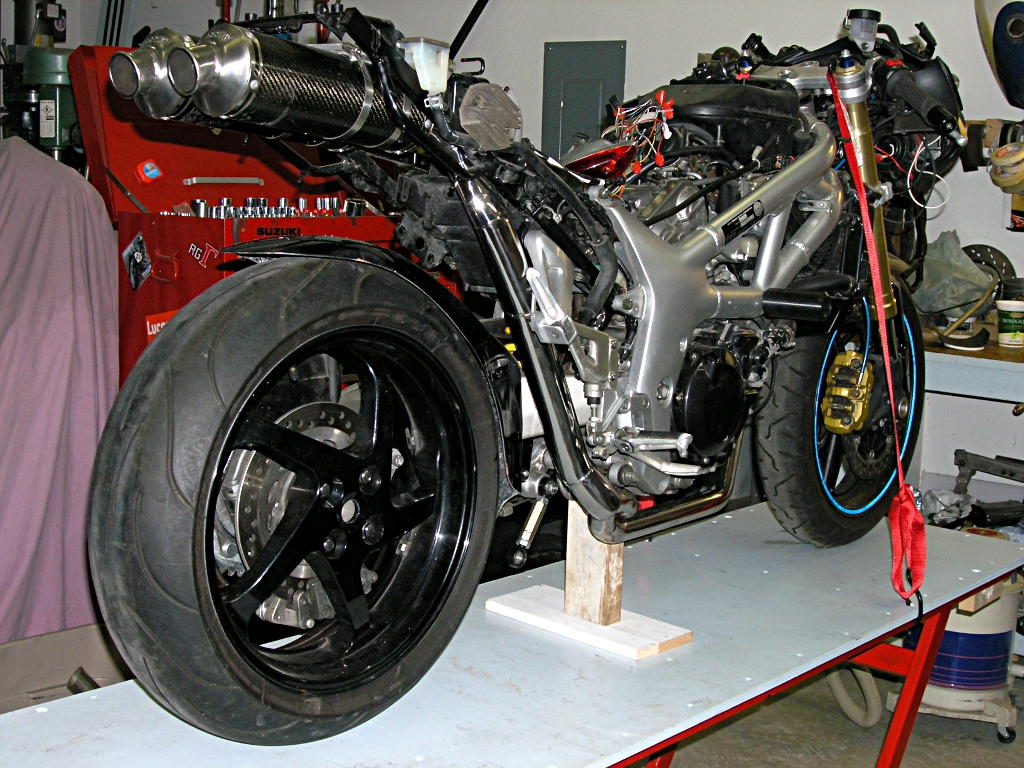
The bike as it currently is.

OK, I got the bike all back together and then I got the engine fired up (after having had to buy a battery charger and crank the engine over a few hundred times). And then I got the chain on and bled the rear brakes...
... and then I went for a short ride around the block :)))  (and discoverd that id put the gear linkage on slightly wrong and that the gears were consequently "upside down"!)

But, there it is, the bike is "built and ready to be registered in a couple of weeks.
There are still lots and lots of "clean up" jobs to do to make it all "pretty", but they can be done slowly over the summer.  For now, I need to get back to house renovations cos Ive got a hardwood floor to install and another bathroom to do a bit of a renovation on. :)


Saturday, February 26, 2011

Bike Progress

The bike is nearly back together again after lots of not getting much of my attention for a couple of months ... I was working on renovating my basement after it was left in rather bad condition by the previous tenant.

Housework aside, here are a few update pictures...


The new mufflers in the back of the bike but with the "undertail" plastic fender removed...


But with the exhaust pipe so close to the plastic body panels and with no air flow in there to keep it cool, Im worriedt that it will melt the pannels... So, I decided to wrap the pipe in some insulating webbing...


So, I then had to make a new substitute "undertail" out of a couple of pieces of aluminium... and it seems to work pretty well after a couple hours of cutting and bending and drilling and filing :)


And now I can put the rear set of body work panels back on and then work on the front end... Side note, Im really having a hard time figuring out which screws and bolts and nuts and bushings etc. go where in this reassembly process because its been a couple of months since I did any work at all on the bike.

Thursday, December 23, 2010

Exhausting Work

I know, its been really quiet on my blog for a while now...
But truth be told, Ive not been doing much of interest... Just going to work and doing the hum-drum 9-5 thing that most of us get by with for the better part of our lives :)
And its been too dark, cold and rainy when I get home after work to be able to do any work on the bike project... I cant even work on the painting of body pannels (too cold outside and too many toxic fumes to work inside).

But, I did manage to hunt around and find an exhaust system solution that I liked...
First off, I found a couple of cylindrical carbon-fibre mufflers at a motorbike wreckers that I really liked the look of.
They were too long but I figured with some cutting, I could get them to fit up under the tail section of the bike... So, I bought them and then got them "cut down" to a size I liked (who knows what they will sound like now?).
The next (and more challenging) problem is the exhaust pipe routing to connect them to the engine!
This was going to take two different sizes of stainles steel pipe and all sorts of precission cuts/bends/welds...
So, first off I decided that I should "model" the pipe I needed in plastic before trying to get it made in steel.
So I bought some cheap plastic plumbing pipe and some bends. I then spent an afternoon on a weekend cutting up the plastic and fitting it in under the bike and taping the mufflers and pipes into position. I got it pretty close... To the point where I was sure it would all work :)
Next problem was to get the steel pipe to use for the real version.
It turns out that thin-wall stainles steel pipe is very hard to find... In fact there is basically none of it available in Vancouver (a city of more than three million people)... I did find some pipe at a couple of auto-exhaust places but it was very thick-walled and heavy... Not what I wanted to use.
After lots more seeking and not finding, I had to resort to mail ordering some sections and then waiting for it to arrive.
It eventually did arive, and so I then called my mechanic/machinist friend Mark and the bike and the bits were collected and taken out to his workshop where hes gonna cut and fit and weld it all together for me.

It is however holiday season here, and it'll take a while before its all done... which is just fine with me since I cant do anything without a workshop in this weather anyway ... Its an over-winter project and Im happy for it to progress at its own rate :)
And thats where things stand at present.

Here are a couple of pictures of how the new exhaust is going and I think its gonna look really good when its done...

Cant wait till Spring  :))

Rear view of the proposed exhaust location


Side view of the proposed exhaust location...

And after more than a month of other activities, I have the bike back and the exhaust system is installed as expected. Mark did a great job of mounting the exhausts, pollishing the header pipes and also making a nice number plate mount with light for beneath the mufflers :))


Sunday, October 17, 2010

Bike Update Number 2

OK, the swing arm came back and it all fits and works like it should   :)

But just for fun, lets review that swing-arm plan...
My initial plan was a simple "cut and weld". The picture below was what the swing-arm looked like before the cutting and welding:


And here is what I "imagined" it might look like when done...

But, after consulting with and letting the mechanic/welder guy "do his thing", this is what it actually looks like...

So, it looks a bit different yes, but Its definitely stronger (due to that welded-in spacer tube) and just as functional. The only down side is that I need to remove the exhaust system if I want to take the swing-arm off again... Thats no big deal though because I shouldnt ever need to do that :)

And Im also very happy about the welding quality which is good because there is significantly more welding in the job than I had planned... We effectively extended the swing-arm by about 25mm by adding in pieces of aluminum plate, in order to make the suspension linkage work properly.


So, the swing-arm welding work is done now and all I have to do to it is get the plastic bits for the chain guard etc. back on and aligned with the new chain position. It isnt completely straight forward but it should be no real problem.

Ive also been patching and sanding the plastic body pannels for the bike and they are just about ready for the colour coat. I temporarily put them back on the bike today just to see how it would look when Im done :)
So, here is what the bike looks like now...


Im really liking the look of that new swing-arm!
But to keep it looking good Im going to have to solve the next big challenge which is the exhaust... The standard exhaust system works just fine of course but it hangs along the side of the bike at the back and pretty much obscures that nice new rear section of the bike!

So I will need a custom system, either with the muffler mounted centraly up under the tail section or a very small muffler mounted right down near the foot peg.
But custom exhaust systems are pretty expensive and I cant afford to buy one new, so Im gonna have to hunt around for a used one that I like the look of and think that I can "make work" for this bike...
Lets see what I can come up with ...

... stay tuned for the next update :)))

Sunday, September 26, 2010

Bike Project Progress

After I took the back-end of the bike appart and measured as best I could, it was time to get the cutting and welding done.
So, I took the parts out to Mark's place and, after having a long chat about the "possibilities and problems", I left them there and went back to doing "other things" for a week or two.
And then Mark gave me a call one evening and said "Its done"... Well, I was actually not expecting that, because when Id left it with him, as I understood it, he was going to do the cutting, but then just "tack" weld the parts back together so that I could do a trial "fitting" onto the bike to see that everything was where I wanted it...
But, "done" it was!
So, I went and picked up the modified swing-arm and set about fitting it onto the bike.

And indeed it basically fits and looks like I want it to :)


The bike doesnt have its "body pannels" on but you get the idea :)


But then I had to try to connect up the suspension linkage which is where I was expecting to have difficulties... And indeed, there were difficulties... The rear shock absorber would not connect to the linkage - It was obstructed because it was contacting the "throat" of the swing-arm yoke!
It was not possible to do accurate measurements of this area till I got the new swing-arm into place, so Im not surprised that my "rough" measurements were off... And as it turns out, I was "off" by about 15mm! (Thats quite a lot)
But, that wasnt the only problem...
After setting things up carefully it appeared that the rear wheel was "off-centre"!
Now, Id been quite carefull to try to get this right so I was surprised to see this. It seems that the swing-arm from the Honda is mounted off-centre in the original bike frame, because thats the only way this could have happened... And, Ive not had the opportunity to measure the Honda bike frame!

 Note that the rear wheel is about 1cm to the left of centre!

So, Having looked at it all again, and measured things all again, it seems to me that the best solution is to re-cut the swing arm and put some spacer sections in to solve the shock absorber problem, and move the wheel back to the right too. Thats unfortunate because that means it will be expensive (This is why I wanted it just "tack" welded for the trial fitting!)... Bummer  :(
So, I gave the bike and the swing-arm back to Mark, and he'll call me again when its done.

In the mean time, Ill go back to doing "other stuff" while I wait.
And this weekend, that included being "Best Man" at my very good friend Rick's wedding with Jen :)


Tuesday, August 31, 2010

You do the Math

Progress report on the motorbike project....
Well, while work life isnt exactly boring, it is rather unexciting... So I figured Id blog about the fun-stuff :)


Project is to modify a Single Sided Swing-Arm from a 2006 Honda VFR800 to fit onto an unmodified 2002 Suzuki SV650 frame.

I have the Suzuki bike, and I have the Honda Swing-arm... Now to bring them together!
The trick here is that the new rear whell is 20mm wider than the original, and that makes all sorts of realignment and fitting issues!

I got some tools together, and managed to take the back-end of the subject bike apart on the weekend. And once I had it all apart, I could set about trying to figure out if Ill be able to get the alternate back-end onto the bike in place of the original.

So, I got my trusty steel rule, and a straight edge and I started to measure all the components so that I could see what had to be done...

First and simplest measurement was the inside frame "opening" width of the bike at the swing-arm pivot (135mm), and the outside width of the pivot on the swing-arm (183mm).
... That means that the new swing-arm is 48mm too wide!
And that means that I have to reduce this width by an equal 24mm on each side of the swing-arm (If I dont do it equally then the rear wheel will run "off-centre"!).
... Wow, thats a lot!

Hmm... Well, my initial plan was to machine the bearing sockets deeper on each side of the swing-arm "yoke" style pivots, but there simply isnt anywhere near enough metal for that idea to work!
So, my new plan is to "cut and weld" instead.
So, Ill carefully cut-off the "free" side of the swing-arm pivot "yoke" (where it branches off the main side of the swing arm), and then remove the 24mm from the inside "cut" end of the removed piece; And then re-attach it to the swing arm by welding it (need skilled Aluminium welder to do this job). The other side of the swing-arm yoke will be used as an alignment jig by running the pivot bolt through the attached and unattached bearings :)
Then, Ill cut off the main side of the pivot "yoke" (about 100mm back from the pivot), and then reweld it back on but 24mm closer in to the centre-line of the yoke (using the same alignment jig trick with the already reattached other side of the yoke).
Then Ill have what amounts to a "majorly mis-aligned butt-joint" in the main load bearing section of the swing-arm!!
Needless to say, I will then need to add some serious "bracket" plates of Aluminium to reinforce the joint... Again, Ill need a professional to do this - Whom I have already located :)))

The old "square" and boring (but eminently effective) swing-arm above, and the new "curvy" one below.

 
 The new swing arm as it is now with "cut-lines" indicated...


And a "photo-shopped" version of how it will hopefully look after the cutts and welds :)

OK, so that will get the new swing-arm to fit into the bike frame with the rear wheel centre-line on the centre-line of the bike!
But thats just the start of the fun!... Now, I have to get the chain to align between the front and rear sprockets... And that, is gonna be really tricky and is what Ive been carefully measuring things for...

Here are all the associated measurements:

For the Motorbike and old swing-arm:
Left Side Frame Pivot Hub face to Frame inside left face - 10mm
Front Sprocket Drive-Shaft face to Pivot Hub face - 18mm
Front Sprocket width - 6mm
Chain width (SV650 525 chain) - 22mm
Chain centre-line at Old Swing-arm pivot - 10mm inside of left side pivot face

For the new swing-arm:
Chain centre-line at New Swing-arm pivot - 20mm inside of left side pivot face
Chain centre-line clearance to left edge of rear tire - 29mm
Rear sprocket width 8mm

Now, Im pretty sure that all that will mean absolutely nothing to anyone reading this, but after having drawn myself up a very careful diagram of all the bits on graph paper, the following becomes clear...

... There is not a lot of space!
... And the front chain sprocket on the bike and the rear chain sprocket on the new swing-arm, are mis-aligned by about 18mm!... Which is lots... Which is a bummer!

OK so what can I do about that...
Easiest solution is to make a "tube" extension to the front sprocket to effectively move it further "out" from the bike centre-line... But with the existing sprocket position, there is only about 13mm of clearance between the outside edge of the chain and the inside edge of the bike frame.
And there needs to be about 5mm of clearance to allow for chain slack and flex...
So, the most I can move the front sprocket is about 8-9mm... Which doesnt solve my 18mm mis-alignment!

Hmmmm

OK, so what about the rear sprocket?
Well, I could do the same "tube" extension there but its a much larger sprocket diameter and it gets harder to do (and I think less mechanically sound too)...
But, if I measured correctly, I have 29mm of available space to the edge of the tire... But the tire is a LOT more flexible than the chain and when the bike is cornering, Im sure that inside edge moves by between 10-20mm!... So, realistically, I can only move it 8-9mm before I get into trouble... And, again, that does not solve my 18mm mis-alignment problem...

Hmmmm

But, as you have likely noticed, If I make the "acceptable" modifications to both the front AND rear sprocket positions, we get pretty much exactly the required re-alignment change! :)))

... And, the rear sprocket modification can be made without the difficult "tube" extension too... The rear sprocket width is 8mm... And I need to move the alignment inward by 8-9mm...
So, the simple solution is to machine off the "teeth" of an old sprocket and mount it as normal to the rear hub. Then, machine out the centre of a new (and slightly larger diameter - more teeth) rear sprocket to "clear" the wheel hub, and then drill and bolt it to the "inside" of the old sprocket disk... This will move the new sprocket by the exact 8mm requirement, and will also be strong and simple to construct :))

So, thats the chain alignment solution.

And the only other issue remaining, should be the suspension linkage...
... There is an attachment point on the bottom side of each of the swing-arms for the rear shock-absorber.
Needless to say, the two swing-arms have different attachment points...
So, again, this will require cutting and welding, but I think its pretty straight forward since I can simply cut the mount off the old swing-arm and weld it onto the new swing-arm in the correct location (after cutting the old mount off of that swing-arm too). Note again that professional welding skills are required here since this linkage point takes the full force of all rear wheel suspension forces... And the forces are amplified by the long swing-arm lever-arm and the short shock-absorber lever-arm... hmmm Need to add some reinforcing too!

Old and new swing-arm suspension linkage points

But, after having "done the math!", I now feel that I will be able to make it all work without too much expense or "precission machining/engineering"

... So now Im gonna commit to "start cutting" and we'll see how it looks after I get the modified swing-arm back. Then Ill fit it to the bike and do another careful re-measurement to confirm exactly what I need done to each of the sprockets.

Stay tuned for the next update on my SV650 Single Sided Swing-Arm Conversion :)))

Saturday, August 28, 2010

A Suitable Interval

As Im sure some of you have noticed (and Im equally sure that others of you havent too), I havent posted anything on my blog for quite a while...
But I feel that a month is a "Suitable Interval" since the end of my tour, and now Im gonna put the od post up again :)

Ive been back in a "normal" life for about a month now and thats long enough for me to "get my stuff together" and so now Im starting in on my first "Project" :)
And as I suggested while I was on my ride, Ive been wanting to work on a couple of motorbike projects.
Now, Id like to do some modification work on the big touring bike, but since its my only form of transport, and my work is a 45 minute comute away, I kinda need the bike to be working ... ie I cant pull it to pieces and leave it that way for a week or a month etc.

So, Ive decided to work on the little "sport" bike project I had in mind...
I started tracking down parts for the project.
So, while I was looking for parts for this project on the local "Craigs List" web site, I came across a bike for sale of the right model year, and with the front end modifications I wanted to do already done.... So, I went and had a look at it and after much thought, I decided to buy it as the base for the modified bike...
I had to take some more money from my loan to do it, but it wasnt too expensive because its an old bike and its been a bit scratched up... Mechanically its very good but aesthetically it could use some more work :)

So, this is the bike (2002 Suzuki SV650S, with the front wheel brakes and suspension of a 2005 GSXR750)...


And then after some more hunting around on the web, and a few phone calls here and there, I found the other major component that Im looking for...

The rear swing-arm of a Honda VFR800...


Its a "single sided swing arm", which means that the wheel is only held to the bike on one side. And that makes the bike look much nicer as far as Im concerned :)... And thats all this project is about... It wont make the bike faster or handle better... Itll just look nicer :)

... But its gonna be quite an effort to get it done.
You see, the new swing arm doesnt naturally "fit" on the bike that I want to put it. Its too wide for the bikes frame, and the suspension linkage is different, and the chain alignment will need to be changes too... Its gonna need cutting and welding and machining etc. So, its a project that will take a while for me to find people to do the work I need done at a cheap price.
And then I need to get the body work painted... And there are a couple of other things that will take time to get done...

So, its gonna take a few months, but its a project that I want to do, and thats under way and that makes me happy, so I thought Id share it with you. There will be some more posts as the project progresses.